There are two parts to a perfect finish: product and application.
Assuming that you have selected the best finish for the job and adjusted its viscosity, now all you need to do is get it onto the wood. The desired effect is a thin, even film on the surface.
Test
When setting up your spray gun, adjust your air and material flow, aim the gun at a piece of white paper, and spray a very quick burst. See the picture on the top. Look at the pattern. Is it the correct size? Is the material distributed uniformly? If the center has a distinct wet spot then you may need to add a little atomizing air or cut back on the material flow.
The picture on the right is a close-up of the cropped area of the picture on the top. See how uniform the dots of color are and how evenly distributed? That is the sign of a high-quality spray gun.
Techniques
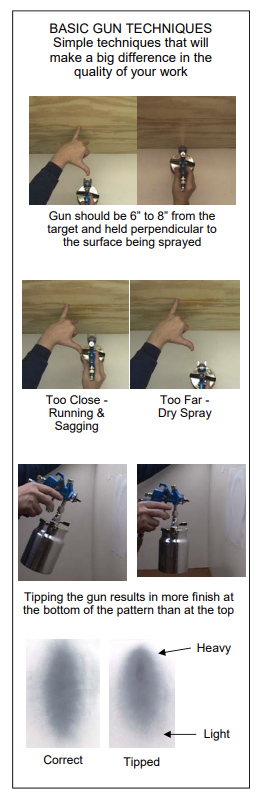
Pull the trigger and create a wet edge. Then, move it across the surface, keeping it wet enough so that everything flows together without excessive build-up that could lead to runs or sags. The amount of material coming out of the gun, the distance you hold it from the surface of the wood, and the speed that you move it will combine to determine how much finish you lay down. A situation could arise where you may find the need to vary one of these elements, and compensate with the other two and get adequate results. For the most part, you want to leave manufacturer-recommended wet mils of finish on the wood
Adjustments
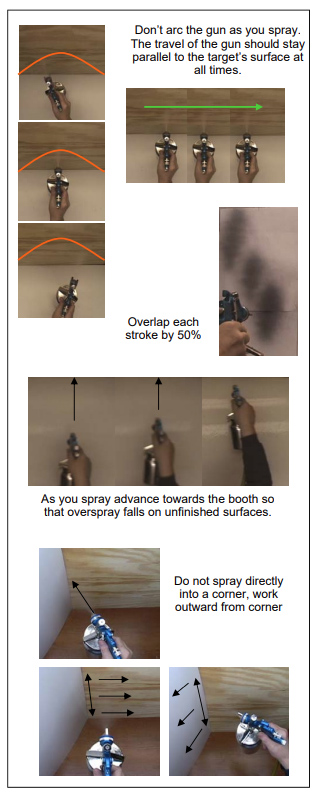
You can adjust the width of the fan to determine how long of a wet edge you want to create, as well as the amount of material that flows out into that fan shape at any given time. The wider the fan, the more material that needs to flow out of the gun. The greater the flow, the faster you have to move the gun. Keep in mind that a spray gun is a precision tool. The material comes out evenly across the length and width of that fan. If you tilt or arc the gun as you move across the wood you will not be applying an even coat. You must keep the gun at a right angle to the work, horizontally as well a vertically.
Correct Angle
While spraying, lock your wrist so the gun addresses the wood at the correct angle, and then use your elbow, shoulder, trunk, and legs to move the gun over the surface at the correct distance from the wood.
A major problem that finishers have to overcome is the angle at which the gun is held is unnatural and can put a strain on the wrist and forearm. You have a normal tendency to want to swing the gun from your elbow. This windmill action will result in less coating being applied at the beginning and end of a pass. Since there is less finish on these two edges, they will often suffer sand-throughs when scuffing between coats.
Correct Angle
Always start spraying closest to your body and move the wet edge from left to right, or right to left, and advance it towards the booth; that way any overspray that lands on the wood is re-dissolved by the new wet edge. Spray your edges first so that any overspray that lands on the face and gets re-melted. Some people make a pass around the perimeter of the face of the piece before spraying the surface. This is called “banding”, as the spray is overlapped on each pass by 50% for air atomized guns and about 25% for air-assisted airless.
When spraying a flat piece, some like to use what is called a “box coat”. This is where you make your first pass across the grain and your second pass with the grain. When you are shooting clears it doesn’t make much of a difference if you use a box coat, or just spray both passes with or against the grain. When spraying a color, box coating helps you avoid stripes. Sometimes, you have no choice as to the method of spray for a piece, as there may be only one way that you can get at it.
Trigger Control
The triggers on conventional and HVLP guns have two positions. Start to pull the trigger, so only air comes out of the tip. As you continue to depress, the material flows and is atomized by the air stream. When you spray an object, pull the trigger to the first position and let the air flow. Before the spray gun reaches the edge of the object, pull the trigger to position number two and let the material flow. After the gun reaches the end of the object, let off the trigger until you only have air flow again. Throttling the material on and off saves material and helps to keep the material from building up on the air cap. By letting the air continue to run through the tip, it blows off any build-up on the tip which helps to keep it clean. This technique takes a little getting used to, but after a while, it becomes second nature.
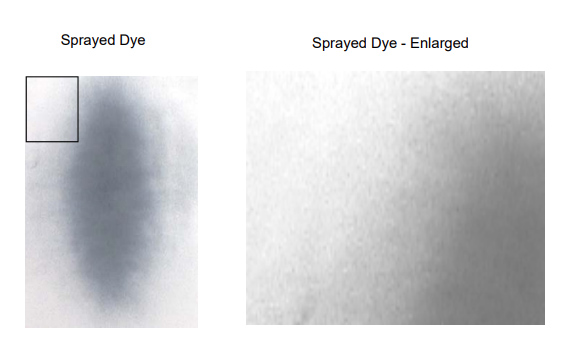
When setting up your spray gun, adjust your air and material flow by aiming the gun at a piece of white paper and spraying a very quick burst. See the picture on the top. Look at the pattern. Is it the correct size? Is the material distributed uniformly? If the center has a distinct wet spot then you may need to add a little atomizing air or cut back on the material flow a little.
The picture on the right is a close-up of the boxed-in area of the picture on the top. See how uniform the dots of color are and how evenly distributed? That is the sign of a high-quality spray gun.
More Techniques
Before you pull the trigger, consider how the work is presented to you for spraying.
- Always figure out where you are going to begin and most importantly, where you are going to end.
- For three dimensional items choose you spray sequence so as to get the least amount of overspray on an already sprayed surface.
- For a very complex piece you may actually have to spray certain sections and then mask them off before spraying other areas. Just make sure that the sections are thoroughly dry before masking them off and then carefully remove the masking right after spraying to avoid pulling the finish off.
- For smaller parts and doors generally most people use a turntable. Is it as a comfortable height so you don’t have to hold your arm in an even more un-natural position than normal?
- Some people use two turntables. The finisher moves between the two turntables spraying the parts, while an assistant loads and unloads them with parts. Once the two people synchronize their movements they can spray a large amount of parts in a relatively short time this way. To watch them move is like watching a dance.
- Larger pieces are usually placed on carts or dollies and rolled in and out of the booth. Wheels also make it easier to spin the piece to avoid having any overspray being dragged by the draw of the booth across an already wet surface.
- When spraying large or long pieces, watch the placement of your hoses. I find it best to feed the hoses from the spot where I am going to end up at. That way you know you have enough hose length before you start and don’t run out in the last two feet. I think it also makes it a little less likely that a hose will get snagged and causing you stall in one spot. This leads to a very wet spot and probably a run.
- Sometimes you have to set larger pieces, or long mouldings, up on saw horses to be sprayed. Try to get as much of the piece into the booth to help contain your overspray.
- I have seen people set parts up on tables or saw horses all over their spray room and the walk around the room and spray them in place. This is a very fast way of doing things, but you run a much greater risk of getting dirt or overspray on your finished parts. Your overspray falls onto the floor or other pieces in the room and is not contained by the booth. Not only do you run the risk of kicking it back up into the air when you move around or hit it with air currents, you can easily overload the room with vapor and make it a pretty dangerous place. Spray in the booth, that’s what it’s for.
- If you are spraying a wide piece, try to make sure it is placed low enough so that you can bend from the waist to stretch over it. Watch your hoses so they don’t droop onto the surface. Always hold your hoes with your free hand. Wipe the dust off of them before holding them over a piece about to be finished.
- When spraying a large piece be sure you have enough material in the gun or tank so you don’t run out before you reach the end.